Quick Links: | Prerequisites | Instructions | Troubleshooting | Next Steps |
Editing media content is a critical skill for instructors who use video in their courses. Whether you're looking to trim the start or end of a video, clip a segment to focus on a specific part, or chop and splice media for more complex edits, Kaltura offers a robust set of tools to help you achieve your goals. This guide will walk you through the steps to trim, clip, and chop/splice your media in Kaltura, accessible through the Canvas.
Prerequisites
- You must be the owner of the video you intend to edit.
- Access to Kaltura My Media through the Canvas Global Navigation menu or directly via media.csuchico.edu.
Step-by-Step Instructions
To open the Kaltura Video Editor, do the following:
- From your Kaltura My Media library, locate the video you want to edit.
- Select the Edit (pencil) icon next to your video.
- Once the video loads, select Launch Editor.

The editor is divided into three main panes:
- Left Pane: Displays media details and can be minimized.
- Right Pane: The Media Player, where you can view your edits.
- Bottom Pane: The Timeline, where you'll do most of your editing work, including trimming, clipping, and splicing.
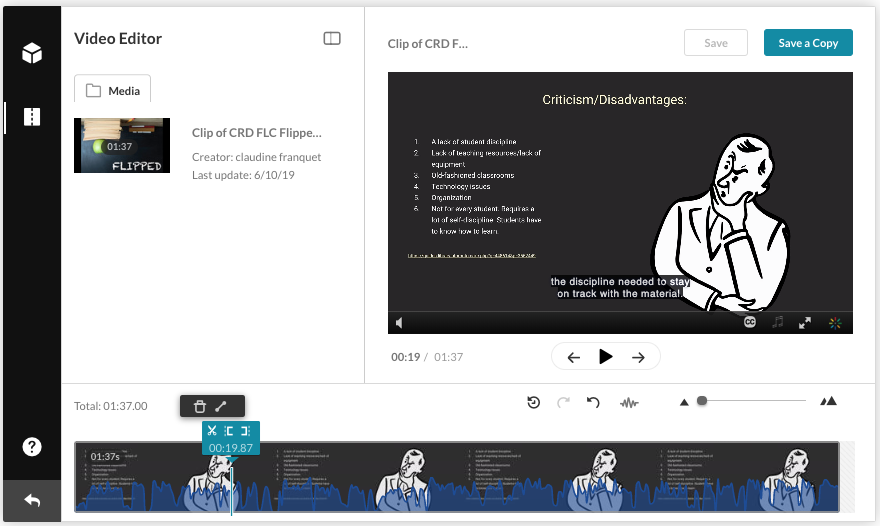
The Timeline pane includes several tools and icons for editing, including undo/redo actions, reset, fade in/out cues, and more. Familiarize yourself with these to enhance your editing capabilities.
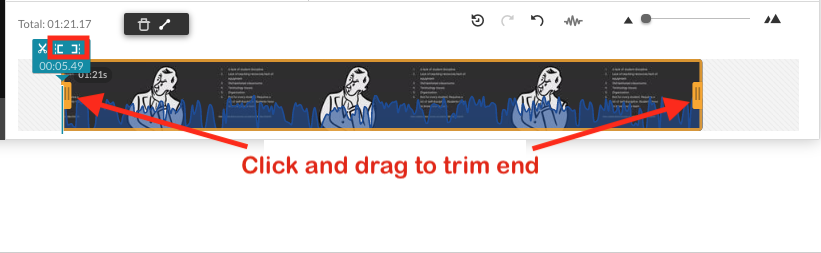
To trim your video, which will permanently alter the start and end times:
- Use the handlebars at the beginning and end of the clip, dragging them to your desired start and stop points.

To remove segments from the middle of the video (splice/chop):
- Locate the marker at the point you wish to start removing and click on the scissors icon.
- Do the same for the point you wish to end the cutting and click on the scissor one more time.
- This action will break down the video into multiple segments.
- Select the segment you wish to remove and select Delete.

Now, you'll see a gap between the two segments. This gap will be removed and the two segments will be stitched together automatically once you save the changes. There's no need to bring the segments closer as it will fill in the deleted parts. Watch video in this article for the flow.
To Save a Copy of your Edited Video:
Creating a clip makes a new media entry without altering the original video.
- Similar to trimming, use the handlebars to set the start and end points of your new clip.
- Select Save A Copy to create the new clip.
By following these steps, you can focus your video on the most important content.
Troubleshooting
- Editing Issues: If you encounter problems during the editing process, ensure you're the video's owner, as editing capabilities are restricted to the owner's permissions.
- Technical Glitches: For technical issues such as the editor not loading properly, clear your browser cache or try accessing MyMedia from a different browser.
Next Steps
Now that you've edited your video to your liking, you can
Share your video
Keep editing your video
Review your video
Still need help? Faculty and staff can reach out to the Technology & Learning Program. Students can reach out to the Center for Technology Equity.
Help us improve our Knowledge Base! Select Yes or No below, then let us know what worked—or what didn’t. Your feedback helps us improve our content and provide the best possible support.