Enable Cloud Recording
From your browser, enter www.csuchico.edu/zoom to access the Chico State Zoom portal.
-
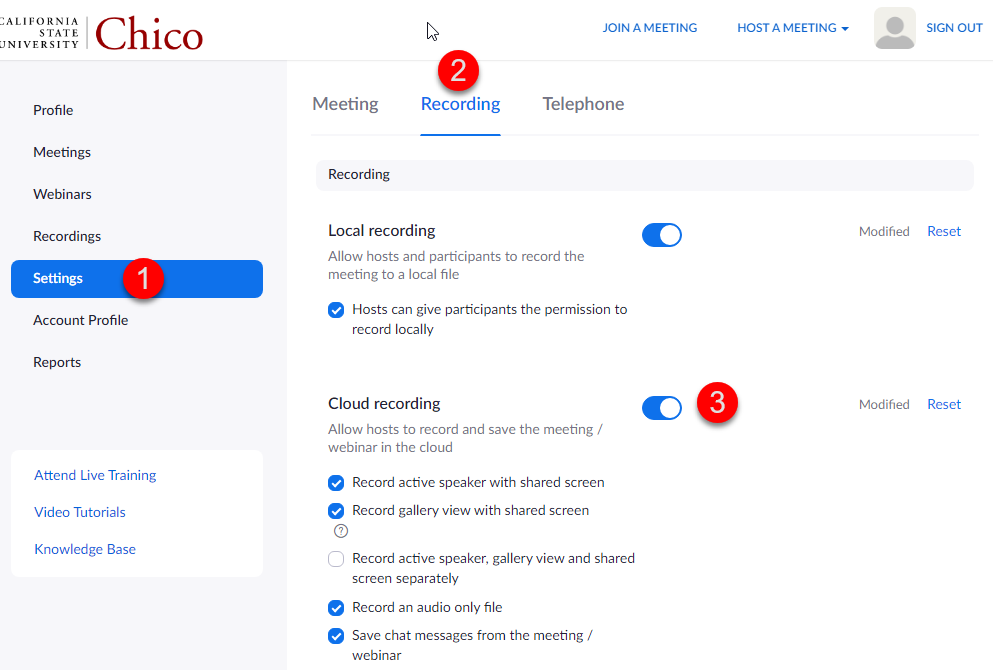
From the left navigation menu, choose Settings.
-
From the top half of the screen, select the Recording tab.
-
Under Cloud Recording, select On.
Quick Links: | Prerequisites | Instructions | Troubleshooting |
Chico State students can enable cloud recording for Zoom to automatically transfer their recordings to Kaltura, the university’s media server, for long-term storage. Cloud recording is essential for students who want to save and manage their class or meeting recordings securely and access them later. This guide walks you through how to enable cloud recording via the Chico State Zoom portal.
Prerequisites
Before you start, ensure you have the following:
- A valid Chico State Zoom account (accessible via the university's Zoom portal).
Step-by-Step Instructions
To enable cloud recording in Zoom, do the following:
- Open your browser and navigate to www.csuchico.edu/zoom to access the Chico State Zoom portal.
- Log in using your Chico State credentials.
- In the left navigation menu, select Settings [1].
- At the top of the screen, select the Recording tab [2].
- Under the Cloud Recording section, toggle the setting to On to enable cloud recording [3].

Now, your Zoom meetings will automatically record to the cloud and transfer to Kaltura for long-term storage.
Troubleshooting
- If you cannot find the Cloud Recording option, verify that you are logged into the correct Chico State Zoom portal at www.csuchico.edu/zoom.
- If cloud recordings are not transferring to Kaltura, contact Learning Technology Services for assistance with your Kaltura integration.
Still need help? If you run into problems or still need help, faculty should reach out to the Technology & Learning Program and students should contact Learning Technology Services.