Quick Links: Prerequisites | Schedule Meeting | Start Meeting | Record Meeting | Share Screen | End Meeting | Check Recording | Embed Recording to Canvas | Zoom Advanced Features |
Zoom is Chico State’s video and web conferencing tool. Everyone (students, faculty, staff) can host and record a Zoom meeting. You can invite participants to join the meeting, or, if it is just you, you can record yourself giving a presentation or screen share. There are many ways to schedule or start a Zoom meeting. These instructions start from the Chico State Zoom portal so you can easily access your Zoom preferences and settings.
Prerequisites
Schedule a Zoom Meeting (optional)
-
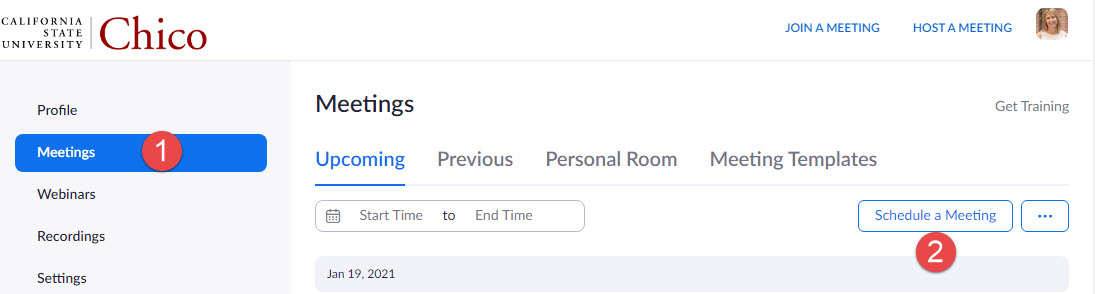
Sign in to the Chico State portal and select Zoom.
-
Select Schedule a Meeting. Alternatively, if you just want to record your screen share, you can choose Host a Meeting in the upper-right.

-
Enter the information about the meeting, including:
-
Name, Date, Duration, and whether it is a Recurring (repeating) meeting
-
Zoom generates a meeting passcode which is automatically encrypted and appended to the meeting link if you sent the invitation through email.
-
If you want to restrict meeting participants to only those who are logged in to their Chico State account, select Require Authentication. All users MUST sign in to Zoom Using SSO.
Please provide them with the knowledge base article prior to the start of the meeting.
Host / Start your Zoom Meeting
There are numerous places from which you can start your Zoom meeting, depending on your preferred method.
Important: Always make sure you sign in to Zoom Using SSO. Using SSO to sign in ensures you are starting the meeting with your full privileges (host, record, etc).
Record your Zoom Meeting to the Cloud
From the Zoom taskbar, select More > Record > Record to the Cloud.
Once you select Record, Zoom adds a shortcut to your taskbar.

Share your Screen
Depending on your course, you may be asked to share your screen during class.
-
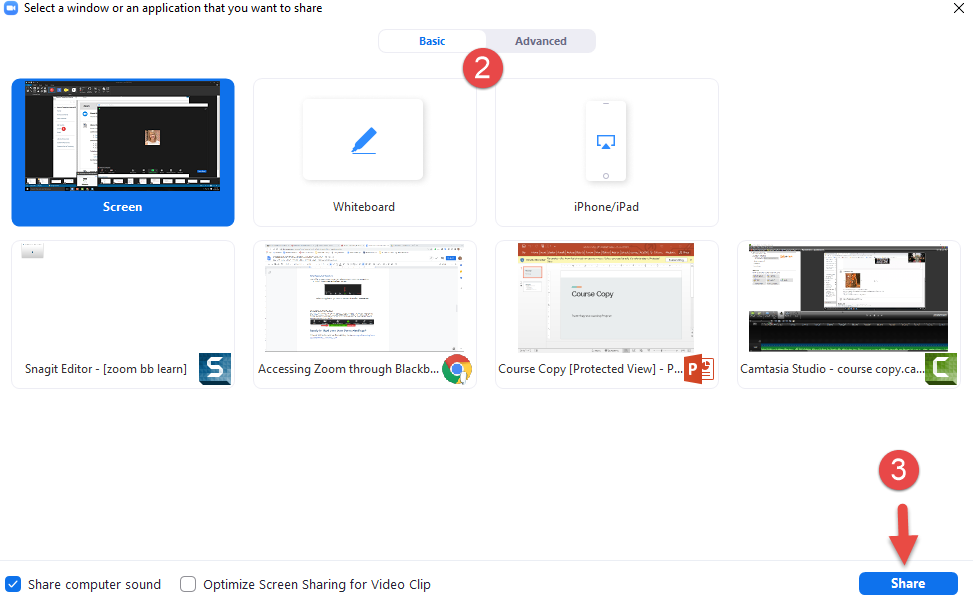
Select Share on the Zoom taskbar.
-
Select the screen or application you want to share.
-
Select Share Screen. For the most flexibility select the Screen option to allow for switching applications during screenshare. Contact TLP if you have questions.
Note: If you want participants to be able to hear sound on a video or other media, you must select Share Computer Sound on the lower left portion of the window.
See Zoom’s help article on Sharing your screen content or second camera for tips.
Moving the Zoom Taskbar
Once you are sharing your screen, your Zoom taskbar moves to the top of the screen.
You can re-position the taskbar to the bottom of the screen by selecting the Dock to Bottom arrow as shown below.

Stop Recording / End meeting 
-
To stop the recording, select the Stop button on the Zoom taskbar. Note: if you are still screen sharing, select the More button on the taskbar.
-
When ready, select End Meeting on the right side of the Zoom taskbar.
Note: the Host must end the meeting before the recording is created.
Check your Recording in Kaltura Media
If you choose to record to the cloud, your Zoom recording will automatically save to your Kaltura My Media library once the meeting has ended. There are multiple ways to access your MyMedia library:
-
From Canvas: from your global navigation menu, select My Media.
-
From your web browser, go to https://media.csuchico.edu/ and sign in on the right.
Note: Sometimes the video can take up to an hour to process in Kaltura, depending on the length of the recording. If the media does not transfer, please email learningtech@csuchico.edu and give them your portal id and the time you recorded the meeting.
Embed your Recording to Canvas Using Kaltura
See the associated knowledge base article for Embed your Kaltura video in Canvas. Note that the instructions for recording via webcam does not apply if you recorded in Zoom.
Zoom Advanced Features
Change Security Settings On the Fly
During your Zoom meeting, you can change Participant security settings “on the fly” and enable or disable features for chat, screenshare, etc.
In the most extreme case, you could Suspend Activity so that nobody could share screen, display video or speak.

For more information and tips on screen sharing, view the Screen Sharing article from Zoom support.