Body
Quick Links: | Prerequisites | Instructions |
Adding icons to your Canvas course pages can significantly enhance the visual appeal and navigational experience for your students. This guide will walk you through the process of choosing, downloading, and integrating icons into your Canvas pages. Additionally, we will cover how to ensure these icons meet accessibility standards, ensuring that all students, including those with disabilities, have a positive learning experience. The process is straightforward and designed to make your course content more engaging and accessible.
Prerequisites
- Access to Canvas as an instructor.
- Basic familiarity with the Canvas Rich Content Editor.
Step-by-Step Instructions
To add icons to a Canvas page, do the following:
- Visit the Canvas Icons Google folder to select an icon. You may also use any image of your choice as an icon.
- Optional: Change the view to a Grid Layout in the upper right corner to make the icons larger.

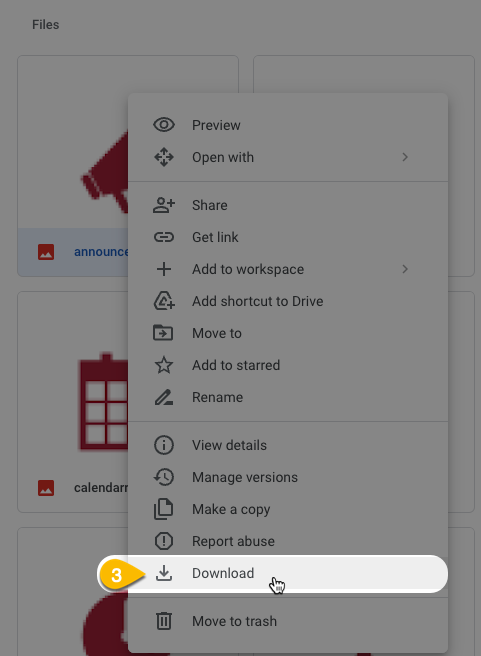
- Right-click on the icon you want to use and select Download.

Once you have your icon, you can embed it into your Canvas page:
- Refer to the guide on how to upload an image using the Canvas Rich Content Editor for step-by-step instructions.
- For creating icons directly in Canvas, follow the instructions in How do I create an icon using the Rich Content Editor Icon Maker.
- After embedding your image, select it to reveal additional options.
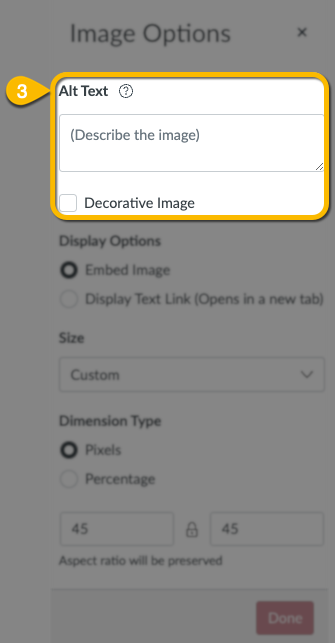
- Choose Image Options. A window will pop up on the right side of the screen.

- Here, you can write a brief description of the image or indicate if the image is purely decorative.

Still need help? If you run into problems or still need help, reach out to the Technology & Learning Program.